


Andrew Doll on the Processes Behind Club Penguin’s Artwork
I’m extremely pleased to share today’s interview with Andrew Doll, who worked at Club Penguin since 2012! He was an artist for the game behind a range of recognisable rooms, and he’s kindly taken the time to share the processes and experiences behind making those rooms a reality while also sharing some concept artwork.
Contents:
Selecting the Ideas
Before any artwork could begin to be created, the Club Penguin team first had to decide which ideas should be implemented. This wasn’t always easy, especially given the quantity of ideas which could sometimes be submitted by the community. As such, there was an established process for ensuring this happened successfully.
When I worked at Club Penguin I was on a team called the “Core” team. This team was responsible for creating all of the content for the monthly parties and any regular Evergreen content updates to the game. Every month the production team would get together for a brainstorm session where we would be given a theme and then come up with a few fun party ideas. At this point the Core team would take one of those ideas and break down a high level story and make a list of rooms, furniture, and clothing items for the party. Once the Core team was given the green light from an executive review panel, it was then up to the various art disciplines to create the content. We would meet up a couple times a week to review progress and offer constructive feedback as a team to make sure that we were creating the most polished experience possible.
Turning the Ideas to Life
Andrew lays out four main stages to creating rooms:
- Brainstorm and concept
- Ink and lines
- Paint and colours
- Functionality
Brainstorm and concept:
Gather references for inspiration/mood board
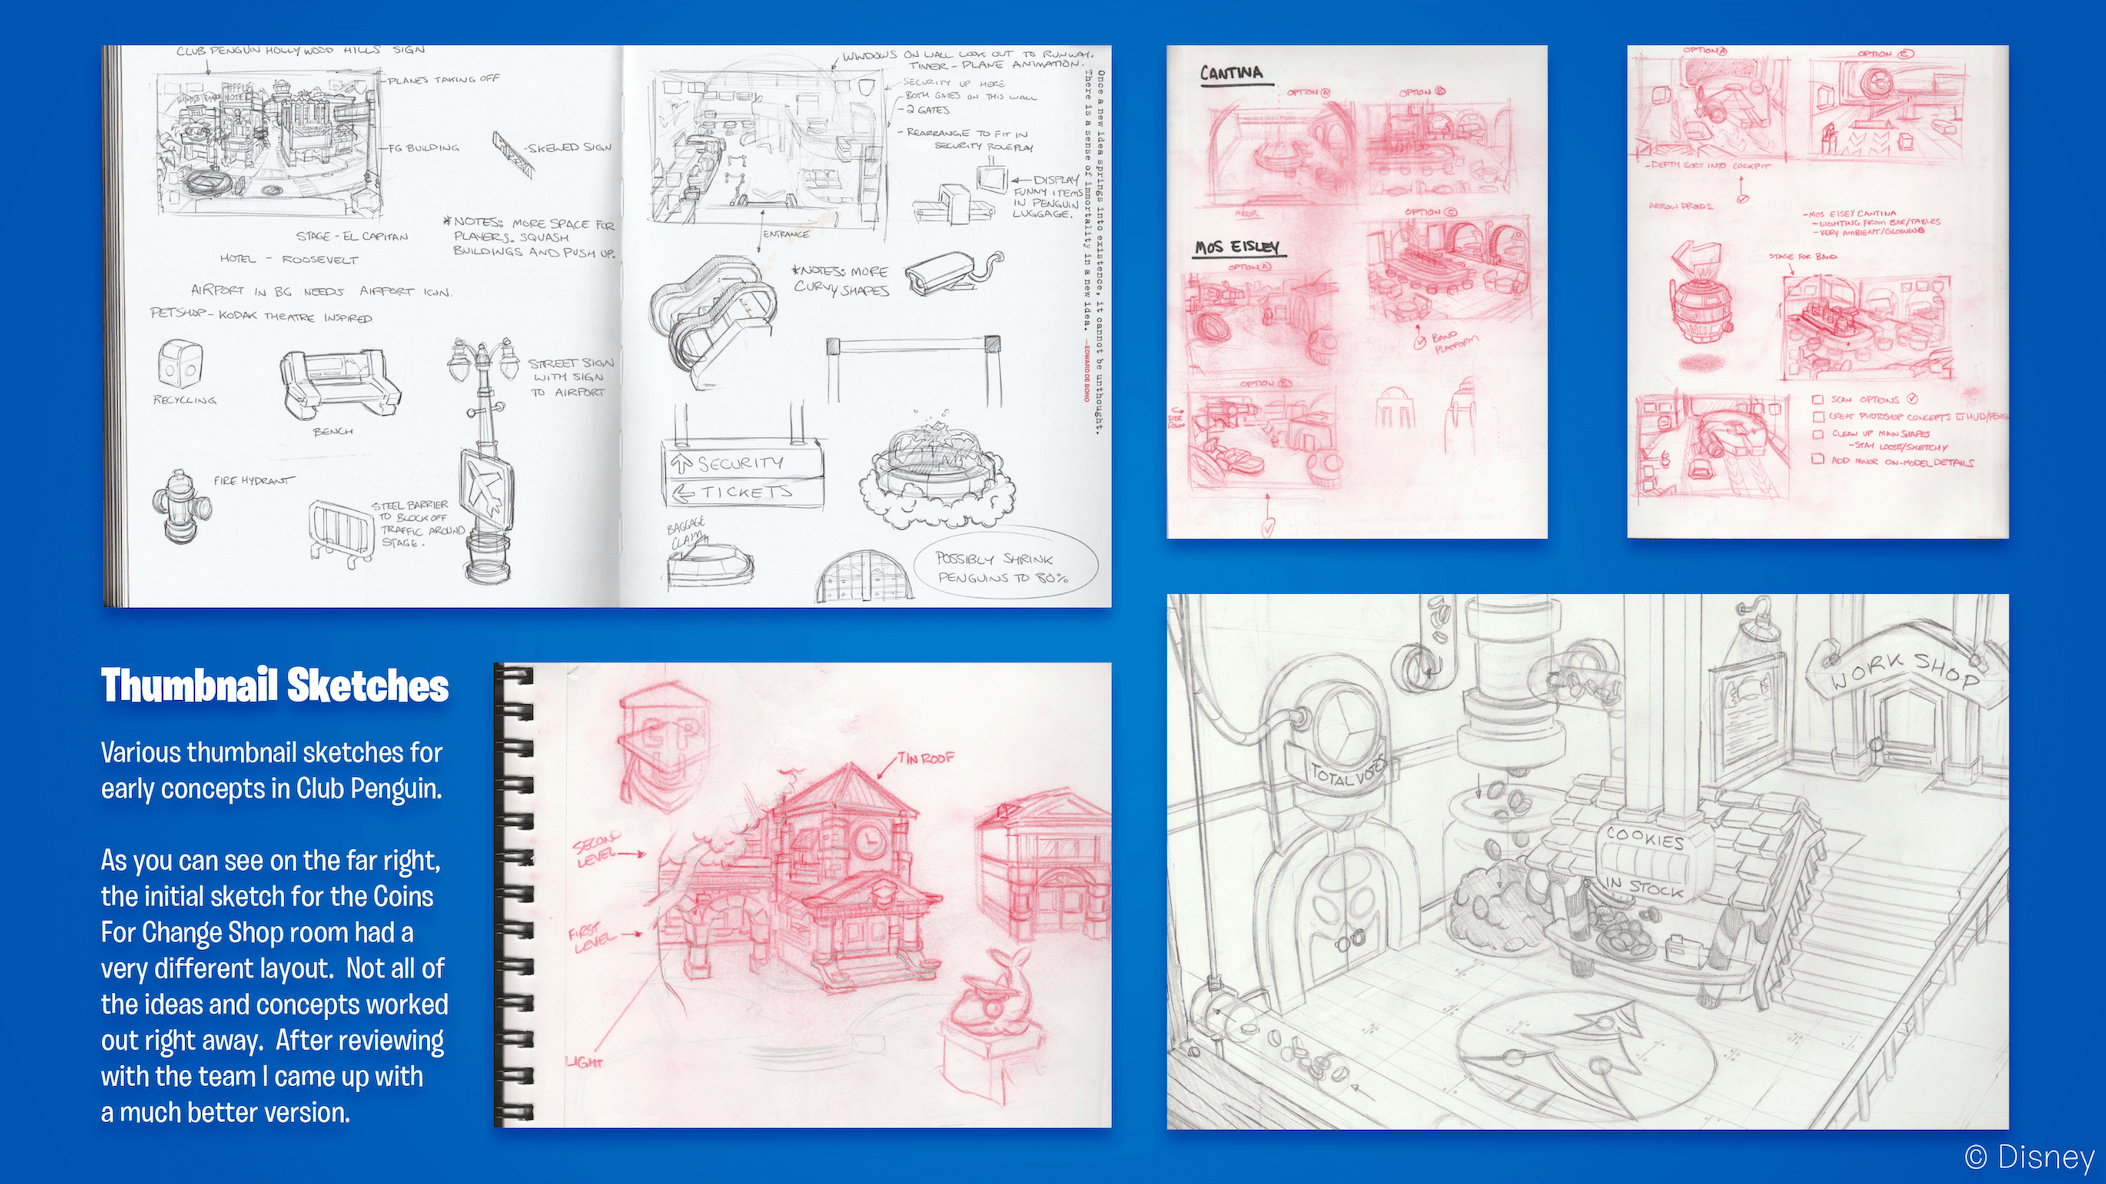
Create thumbnail sketches to get the ideas flowing
Create a concept based on thumbnails and show it to the team for review.
Featured below are various of those thumbnail sketches. The sketches in the top left appear to show the Airport which was included at the Muppets World Tour in 2014, and the top right show rooms from the Star Wars Takeover during the same year.
In the bottom left, you can see some of the sketches for the exterior of the School building, which replaced the Recycling Plant in 2013. The bottom right shows a concept for the Cookie Shop that was part of the Holiday Party in 2012, but as stated in the image, the final design was considerably different.
Ink and lines:
Just as some context for those who are unaware, Adobe Flash Professional was the tool used for this.
Draw over top of the concept using preset line widths in Adobe Flash Professional.
Paint and colours:
Sample colors from your concept and use the bucket fill tool to fill in your inked room. We would use a slicer line to cut into and separate fill zones to add stepped/cel shading. A slicer line is when you set your line width to the smallest it will go and change the color to a bright, easily identifiable color to remove after it is no longer needed.
In order to give an example from one of the rooms in the sketches above, this was the final result of the Plaza and Airport at the Muppets World Tour (top left sketches).


Functionality:
The final part of the process was adding the interactivity! Continuing the example above of the Airport at the Muppets World Takeover, these included features such as how the carousel on the left of the room would be animated to move baggage, along with a button to change the destination shown on the right.
All of the rooms we created in Club Penguin required ActionScript code to add interactivity. We had a great team of programmers that built a lot of awesome features for those parties as well as adding some functionality to the rooms. Not all, but some of us artists on the Room Art team knew how to program in ActionScript so we would create the code for our own rooms and make sure to get one of the programmers to review it. Creating the art for the rooms was such an awesome experience that I liked to do, but programming and figuring out new ways to add some cool room functionality was one of the things I enjoyed the most.
Separately, Andrew notes that artists would generally work on each piece from concept to ink and paint, although there would occasionally be some collaboration where different people would complete different parts of the process – this wasn’t the norm though.
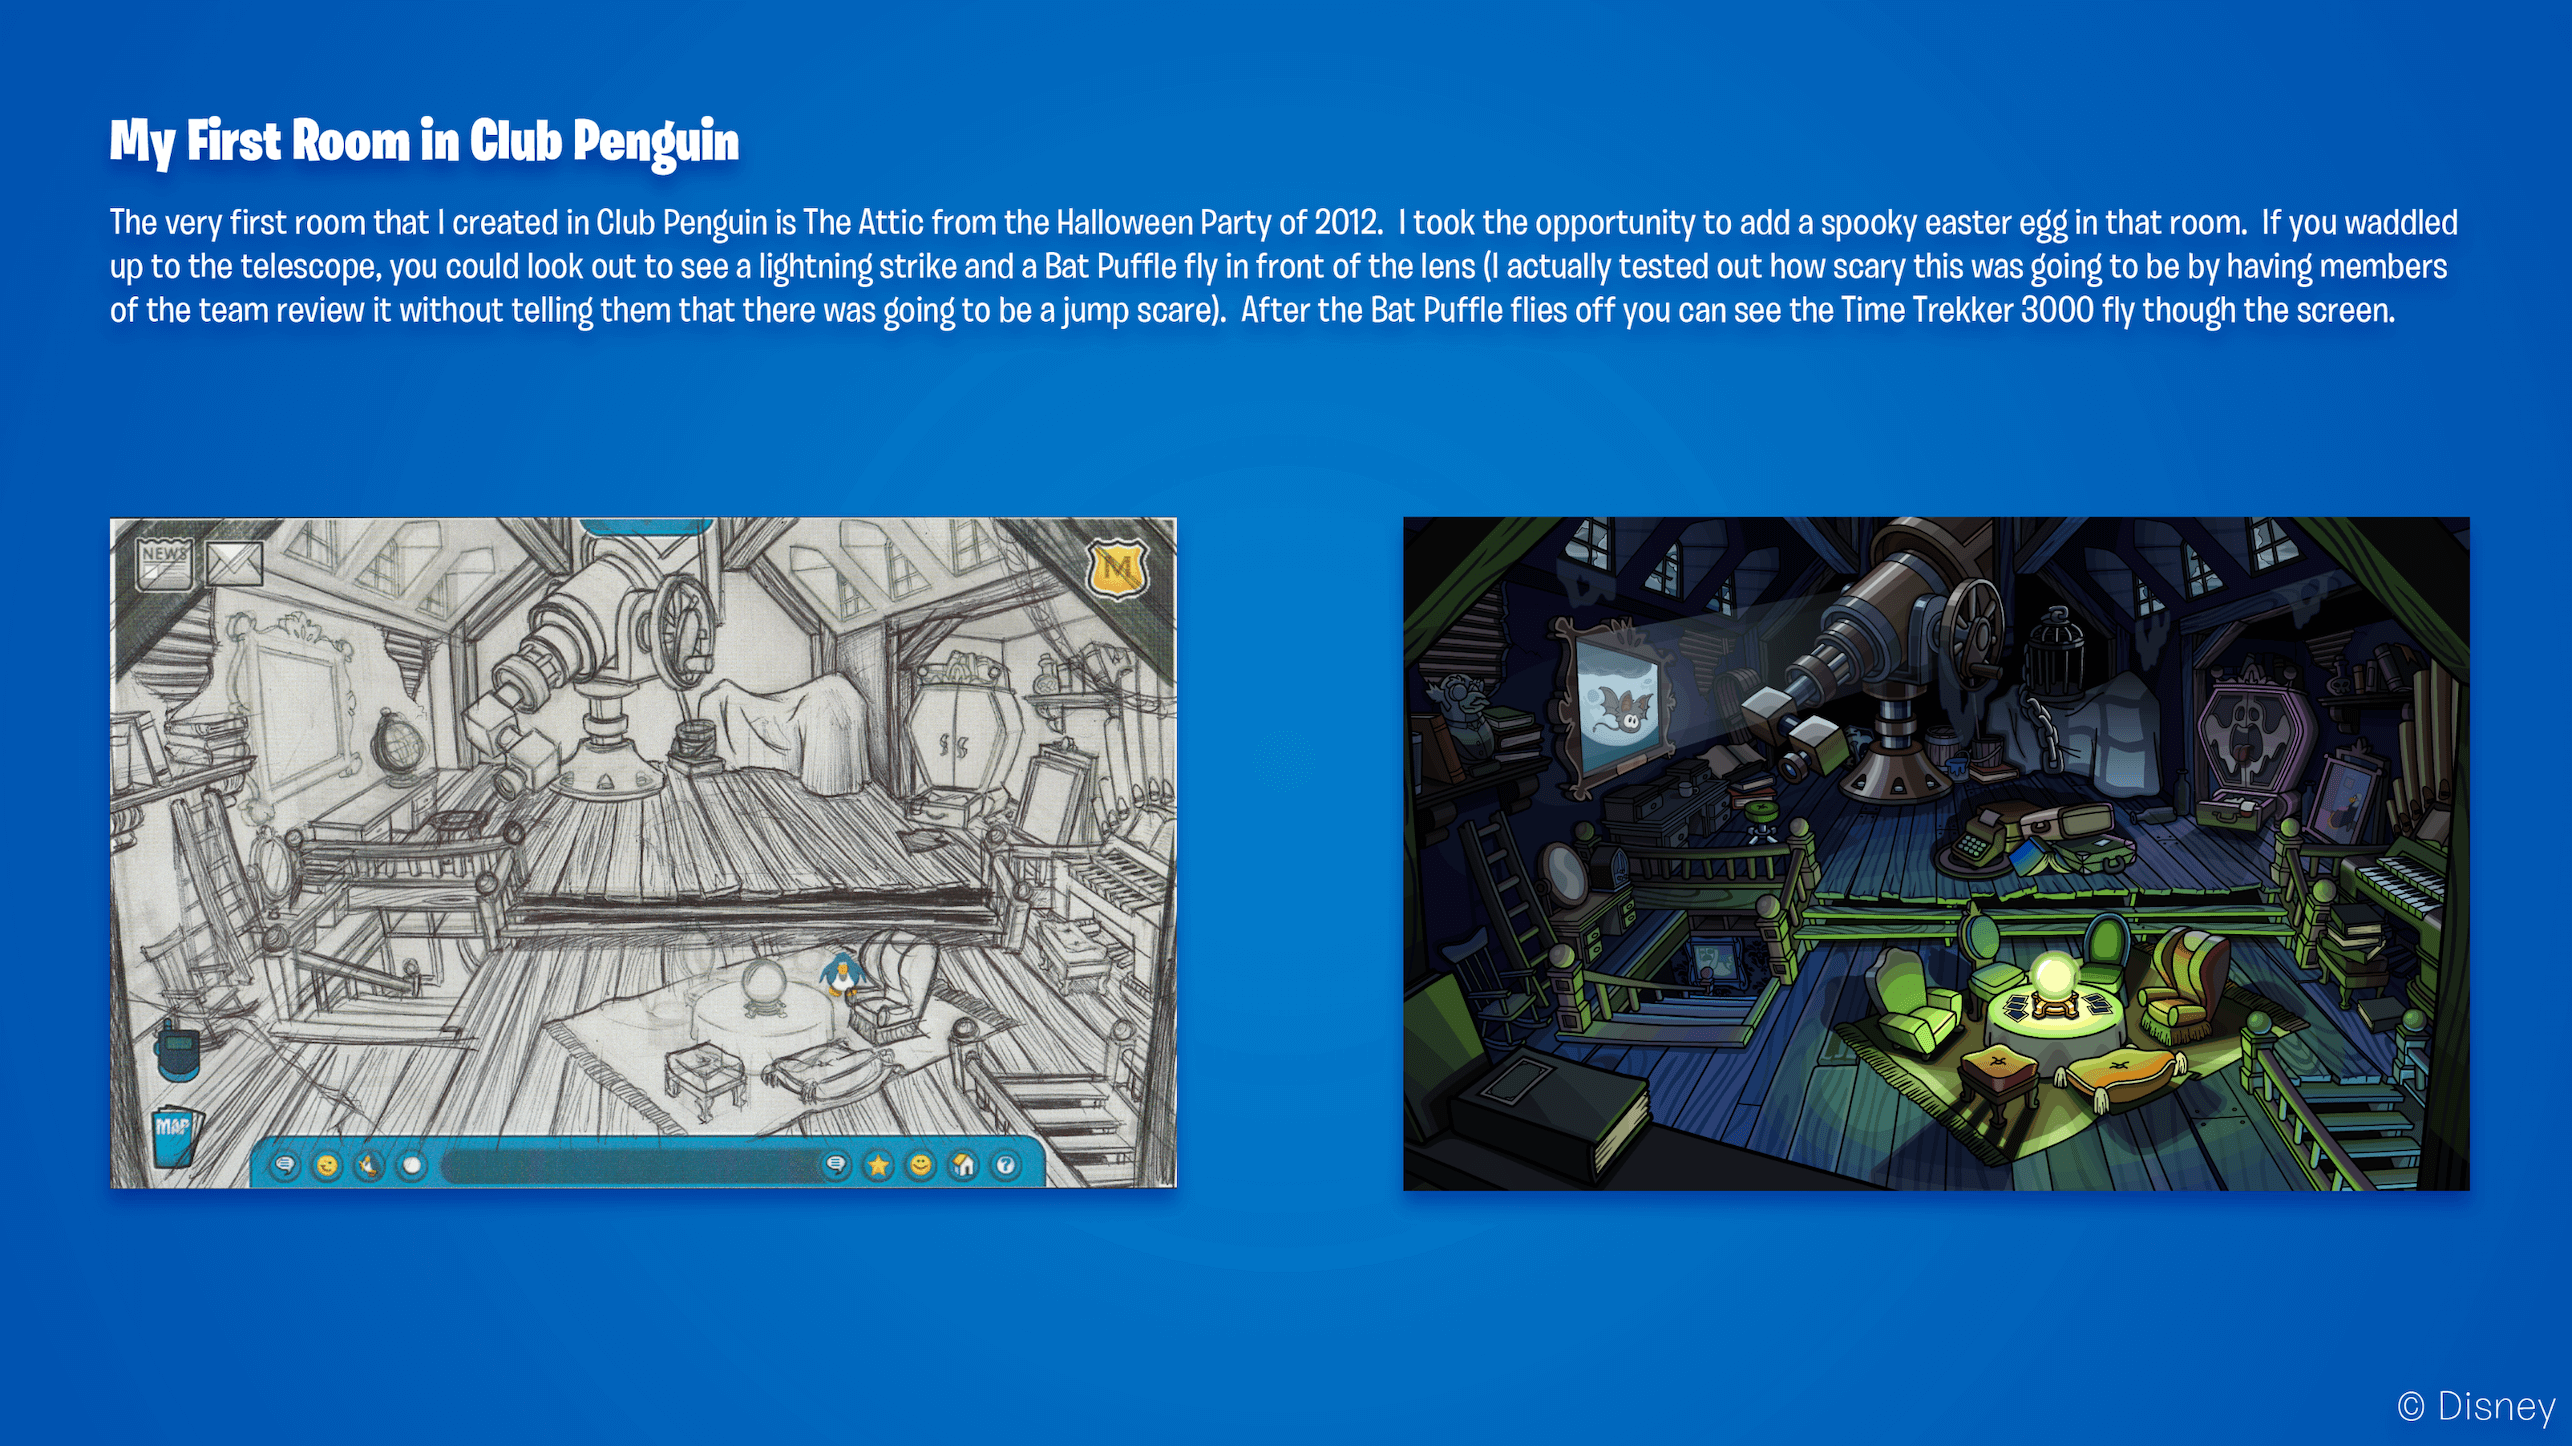
You can see the whole process demonstrated below in other rooms below too! This one was from the Halloween Party in 2012, and the image includes an anecdote about how it was put together.
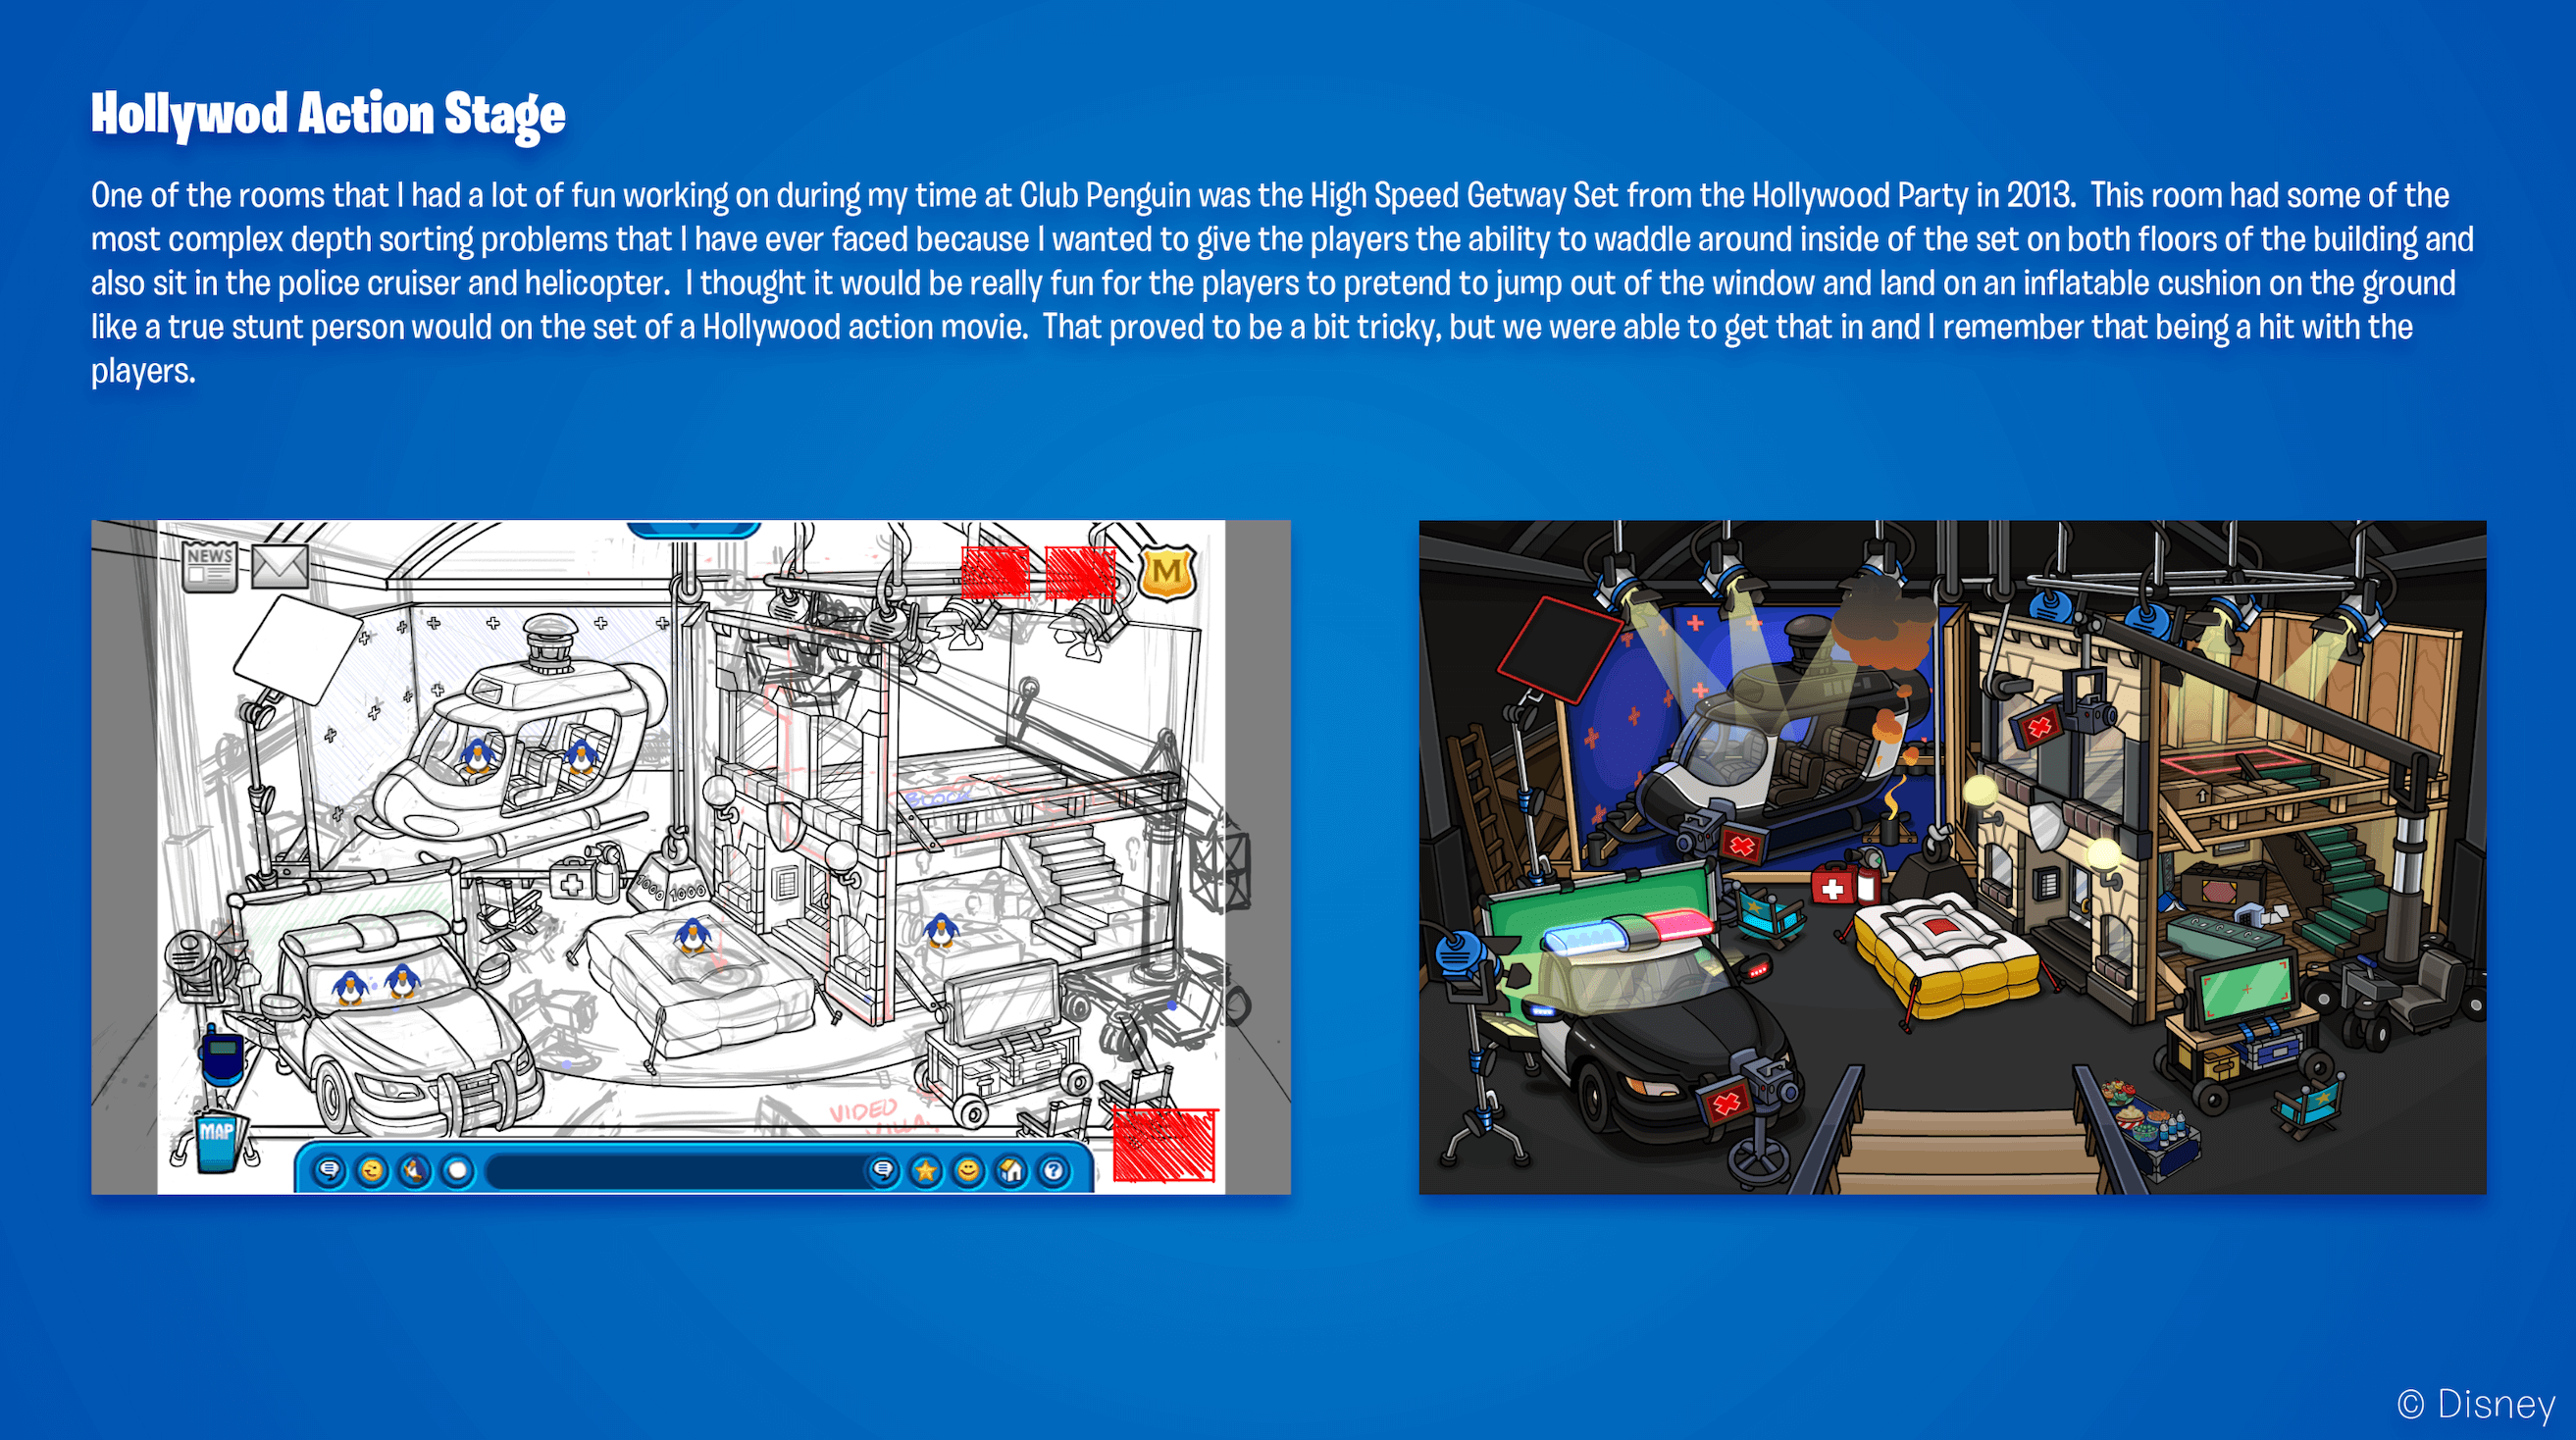
One of the rooms also shared by Andrew was the High Speed Getaway Set at the Hollywood Party in 2013. As detailed in the image, this was filled with features and complicated to create due to the high ambitions held. Interestingly though, although this particularly room was received extremely well, there was often nervousness when releasing these sorts of new events!
There was definitely nervousness around how a party or new feature was going to go over with the players. At the same time though, there was also a lot of excitement around how the players would respond. On release day we would always log in with our Penguins and waddle around to see the reactions. It felt rewarding and inspiring when we saw the players waddling around, interacting and role-playing in the party.
I still remember the Hollywood Party in 2013, and it was definitely extremely popular for roleplaying!
The Challenges
Alongside the room process, Andrew also detailed some of the challenges which he experienced in his time at Club Penguin! I should note that some of these are quite technical, but in the example below, it’s effectively being highlighted how the team managed to avoid situations where penguins would look odd around their surroundings because of the different layers.
In the early days when I was working on room art there were a few challenges that I regularly encountered. One of those challenges was figuring out how to build the room in parts that would allow the Penguins to depth sort between the various layers. This was achieved by strategically placing each objects pivot point in a location where if the Penguin was below the pivot point on screen it would appear above that object, but when the Penguin waddled above that pivot point, the Penguin would appear behind that object. It was always a goal to provide the player with a sense of dimension and depth to the rooms so when a room design became a bit more complex with multiple levels, placing these pivots and strategically breaking up the art was challenging.
The example below is also quite technical, but details how the team would deal with ensuring rooms had exciting animations and interactivity without being too heavy, thereby causing problems on slower computers. Also, just to note for context, “caching” effectively refers to storing the data for future usage.
Another challenge that I faced in the early days when I was working on Club Penguin was finding ways to add more animation and interactivity to the rooms while also keeping performance and file size in mind. Every time there was something moving on screen, the Flash Player would redraw that area of the screen. Because Club Penguin was created using vector artwork, the file size was relatively small, but there were thousands, in some cases millions of vector points in the artwork. Redrawing this artwork when something was animated was very costly to performance so we had to come up with some tricks to optimize this for the players out there that didn’t have the newest and fastest PC’s at that time. One optimization method I came up with was using a feature that Flash has called “Cache As Bitmap”. This takes the vector artwork and converts it to a lightweight easy to render raster or pixel version of the art. I built a custom script that took an animation and converted every frame in the sequence to a symbol that would “Cache As Bitmap”. I had every animation frame appear offscreen and create the bitmap cache on the first frame that the player entered the room. I would have each bitmap frame appear on screen in its correct location on the frame when it was needed and then I would move it off for the next bitmap frame. This would just loop as long as the player was in the room. After we found this method to prove quite efficient with boosting performance a few of us Room Artists and some of the Core Programmers worked together on implementing this idea on the Penguins as well. When a player would move around the screen or dance or throw snowballs, they would be redrawn as vector artwork, but once they stopped to type a message, or sit and read the newspaper, they would be cached as a bitmap and would not redraw until they moved again. This really boosted performance when we really needed it.
This ended up being really significant to the team, and resulted in Disney Inventor Awards following a filing for a patent in the USA.
The work we did to optimize the Room Art and the Penguins was a really big win for the team. It gave the game a boost in performance that was really needed at that time. This work was submitted through the Disney Inventor Awards program which recognizes innovation within the company. Our team was rewarded with Disney Inventor Awards and plaques after we filed for a U.S. Patent.
Alongside these developments, Andrew also shared examples of some tools which he created to improve the workflow of the Club Penguin team to create rooms.

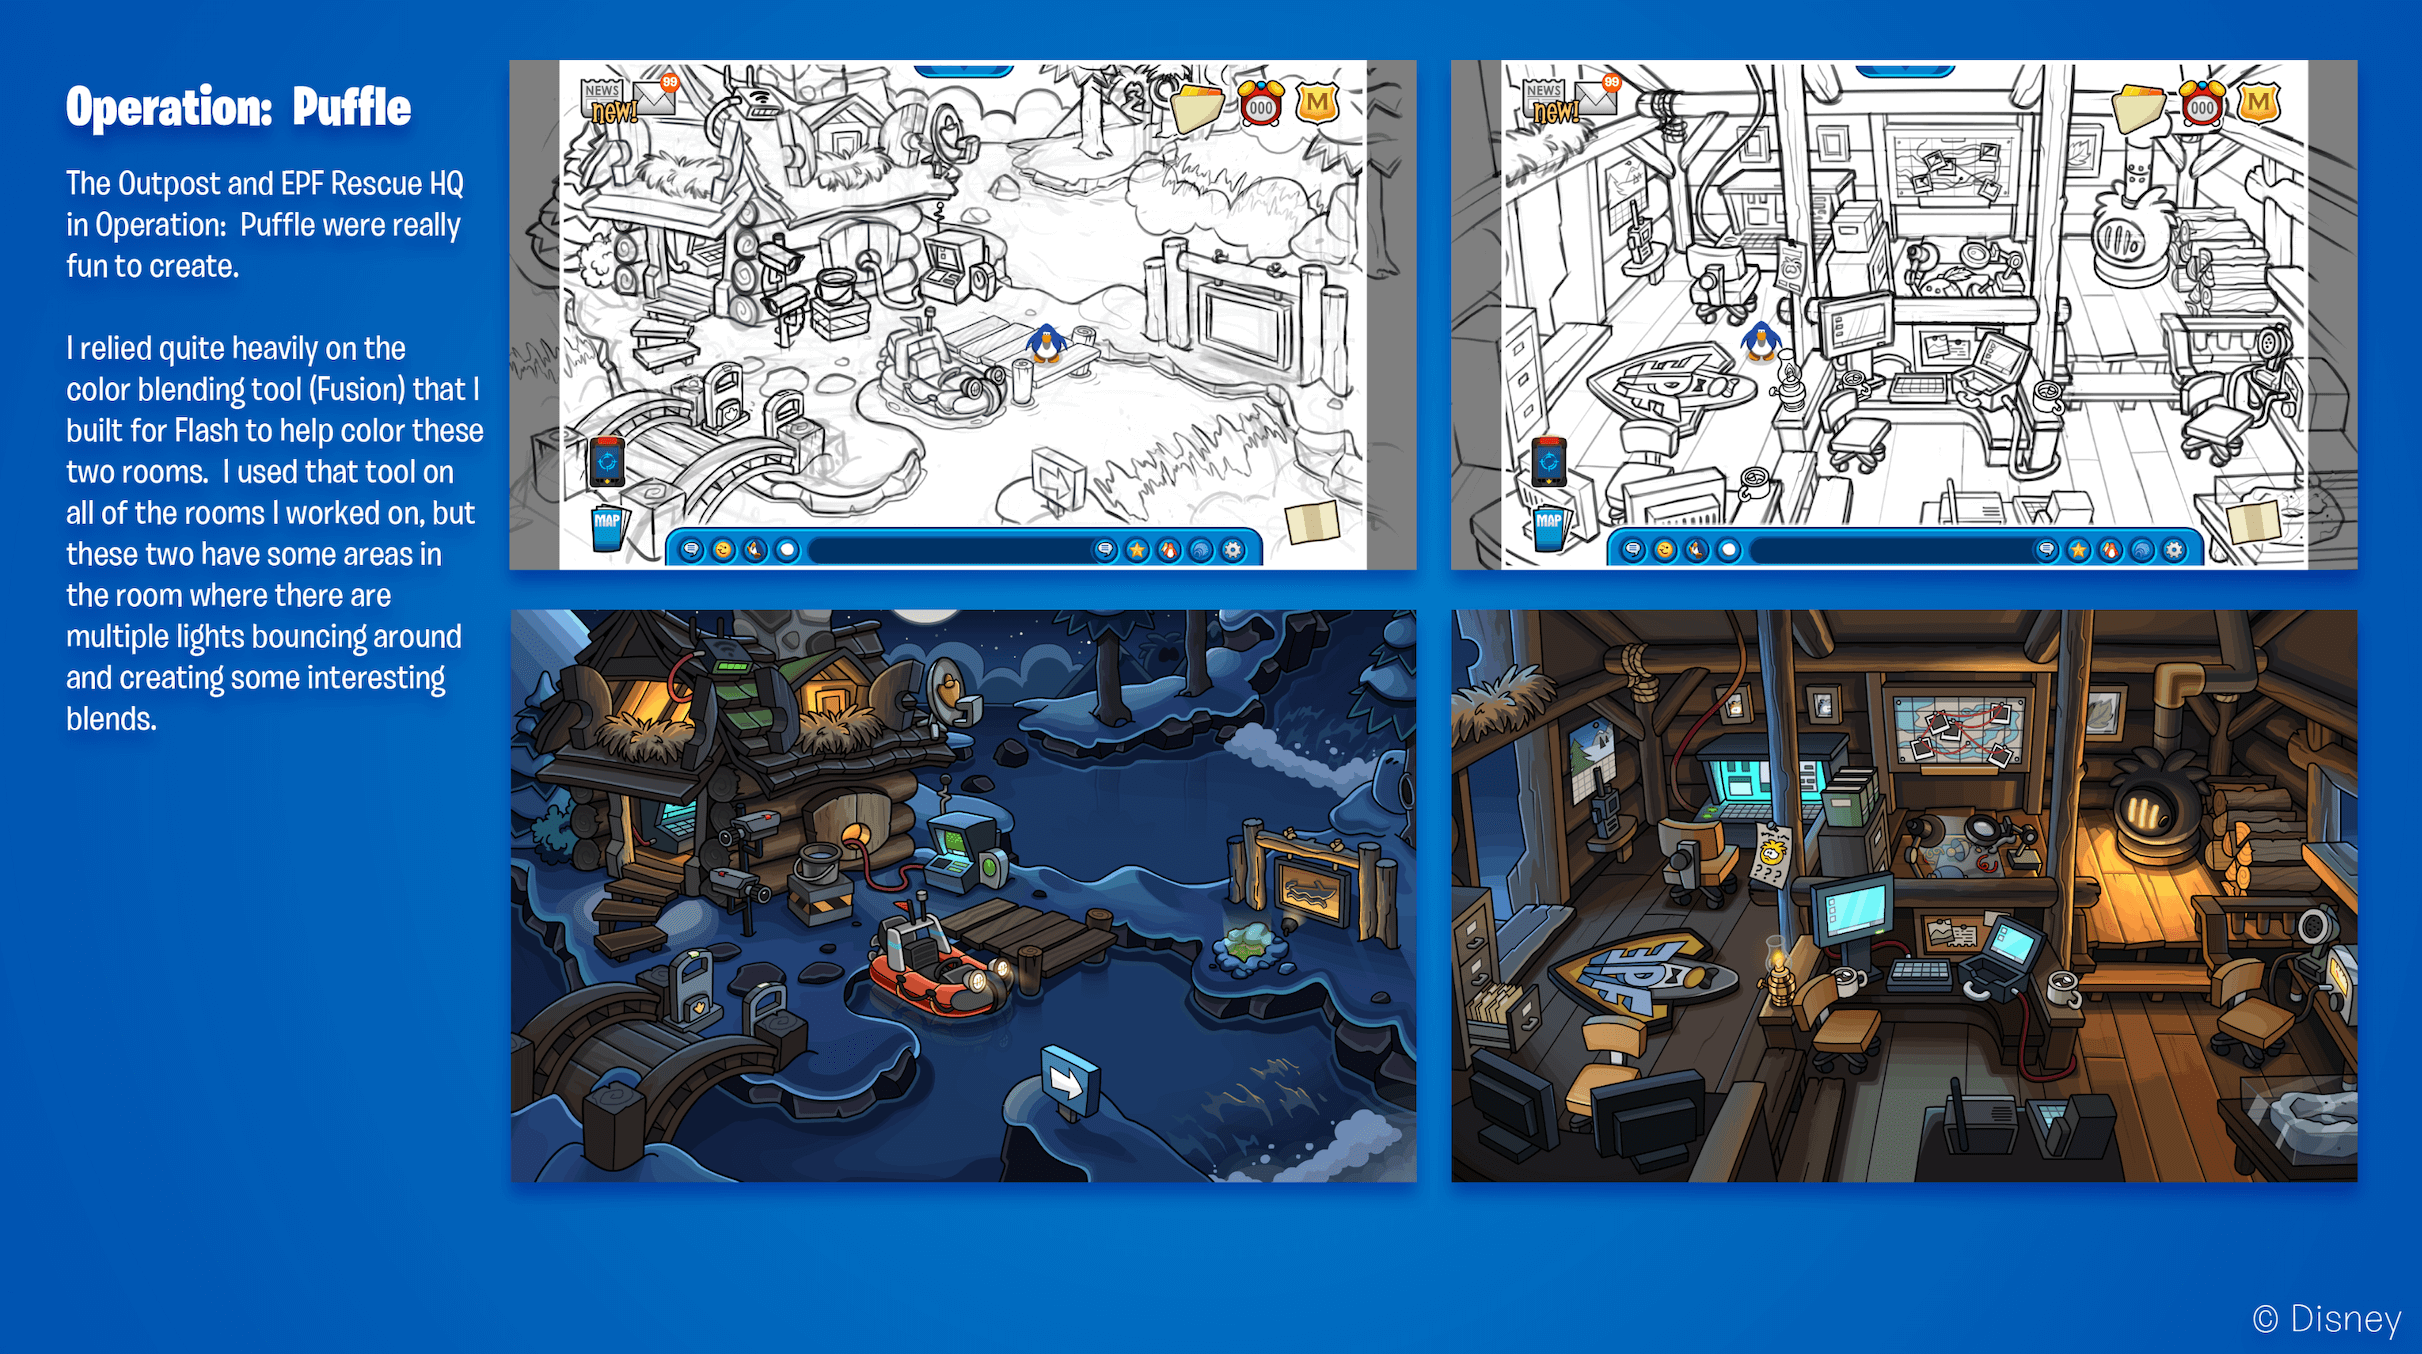
One of those tools referenced above is Fusion, which helped with creating colours. An example of where this was used was during Operation Puffle in 2013, which was an event held during the nighttime. Those sort of events required some remarkable lighting, and as stated below, Fusion helped to create these blends.
These rooms below were The Outpost and EPF Rescue HQ at Operation Puffle in 2013.
Club Penguin Island
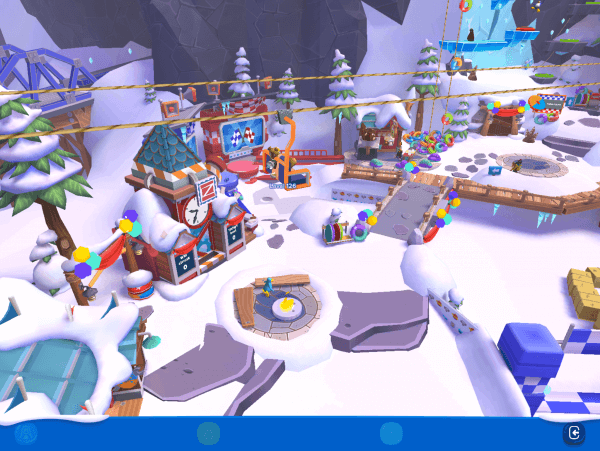
When Club Penguin closed as part of the transition to Club Penguin Island, the island had to be completely redesigned into a new technology. For example, you can see some of the Mt. Blizzard landscape below, and just how significantly the 3D artstyle varies from the rooms above.
That being said, Andrew still helped bring Club Penguin Island to life, though the transition brought challenges and excitement especially because so much of it was new! His recollection of this is detailed here:
Transitioning from 2D artwork to 3D artwork was both difficult and exciting all at the same time. Translating the goofy and quirky designs from 2D to 3D as well as introducing a new and refreshing visual look to the game was tough, but thankfully we had a lot of very talented people at the studio to help make that transition possible. We ultimately landed on an art style that worked well for readability and was very appealing. There was definitely a lot more that we wished we could have done, but at the time we were quite limited by the minimum spec device that we were supporting which was the second generation iPad. It is quite underpowered and did not have a lot of RAM [memory] available so we had to be quite strategic with how we designed certain parts of that world. Though it was very difficult to limit the amount of creativity and functionality in Club Penguin Island due to low-end device support, we were still happy with how the game transitioned from a 2D to a 3D art style. There were some really fun new things that we were able to do by having a 3D space to waddle around in and the players out there really seemed to enjoy it as well.
Conclusion
I’d like to give a huge thank you to Andrew for taking the time to answer my questions, and for sharing some of the fantastic artwork and concepts included in this post. I’ve always been curious about the creative processes behind Club Penguin, and I hope you’ve also been interested by reading about this process! If you’d like to find more about Andrew, you can view his portfolio here.
Thank you very much for reading!
Waddle on!
-Torres 126


13 Comments
nick
Excellent read! His rooms are very pretty.
Torres 126
Glad you enjoyed it!
ulasgazi09
Please Torres, make more content like this, this was so good!
Torres 126
Thank you! I love doing interviews, but it’s often hard to find people willing to give up the time to explore Club Penguin again like this. There have been some more interviews in the past if you’re interested: https://clubpenguinmountains.com/category/mountains-monday/interviews/
Anonymous
I like the fact that you are trying out new things in the past few weeks
The real life drawings and photos from your viewers for the Mountains Monday posts is a great and there was of course the first summer giveaway I think
And now this in depth interview was very interesting to read and I hope you add more new things to Club Penguin Mountains
Torres 126
Thank you very much! I’m glad you enjoyed it, and feel free to let me know if you ever have ideas too! 🙂
Roxy6449
If Disney ever published an Art of Club Penguin book, I would totally buy it
Torres 126
Agreed!
Whale94
This was an awesome interview! As a player since the 2006-2007 era, it’s so fascinating to see how the style changed throughout the years. I know the nostalgia makes some people not as happy with the changes, but I can really respect how much work goes into making this game run and how awesome and creative you have to be to make it work.
Loved this!
Torres 126
Thank you very much, I’m glad that you enjoyed reading the interview. 🙂
PGPUFFLE
Hey Torres, I have a question. Why is that secret EPF game, Ice Breaker, not in the Arcade? They should put it there for easier play. And if they do put more games in, they might as well put in that snake game from the DS EPF game. Mabye even that boring bolt game. I just want a bigger arcade(also mabye something like Penguin Pinball, which I made up)! Also, this art is really cool! Love the easter egg in the halloween room!
Torres 126
Hi! I can’t remember all those games, but I imagine that it would take time converting any future games to HTML5, which would probably be the difficulty of doing ones that wouldn’t be popular or played a lot. Agreed though, the artwork is amazing!
Anonymous
Yeah, but that snake game was fun!